
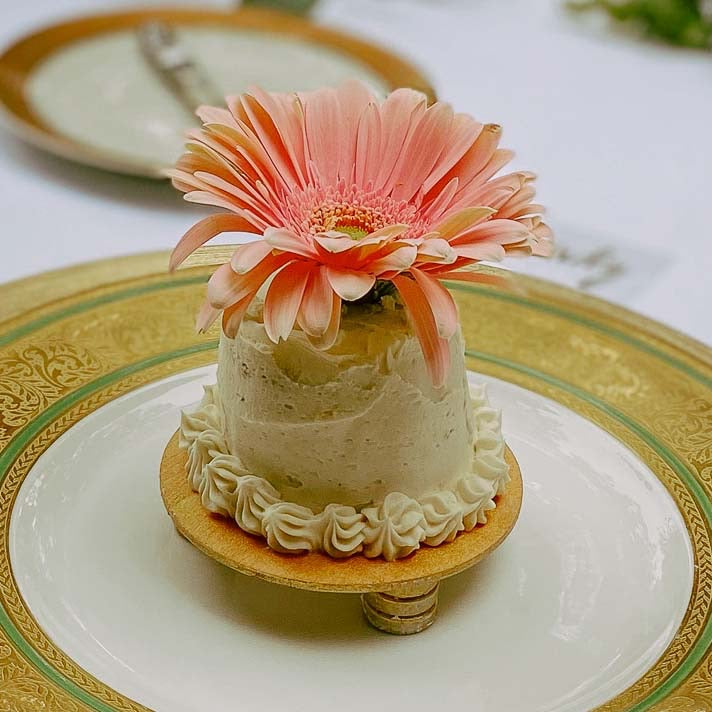
Individual Party Cakes
You can read the whole story about the beautiful outdoor rehearsal dinner given by our friends, Kathleen and Bill, in another blog article of mine, "Dreamy Garden Rehearsal Dinner - Even in a Pandemic." It turned out to be a perfect evening for a bride and groom, who had to change their wedding plans, and one of the highlights was the dessert made by the mother of the groom, Individual Party Cakes.
One of the nicest things about this delicious cake with such a beautiful presentation is that you can make and freeze it ahead of time. It's also very reasonable in cost and wow, the look of it makes any celebration about 10 times more special!

Kathleen is originally from Texas, and in the South it is customary to do a "charm pull" for a bridal shower or a luncheon for the wedding house party, or in some cases, put the charms in the actual bridal cake at the wedding. This is a photo from a shower she gave a bride and she made the Individual Party Cakes with charms inside.
 photo by Mark Eric
A charm on the end of a ribbon is planted in the bottom layer of individual party cakes or the actual wedding cake with a card on the end of the string, explaining what the charm symbolizes. The event is called a Charm Pull where each girl pulls the charm out of the cake to see her fortune and bring her good luck. This above photo shows an example of a southern wedding where the house party all participated in the charm pull from the actual wedding cake.
 photo by Valois Designs
Sometimes the charms are inexpensive and just for fun, and sometimes they are legitimate jewelry as a gift for the girl. The cakes Kathleen made for the rehearsal dinner were the same as the charm pull cakes, minus the charm!

The finished cakes make any event quite special, and each guest not only has their own dessert, but also their own flower. This dessert is sure to make your next special luncheon or dinner a success with lots of flair!
Making the Cake
Ingredients
Cake Mix (make according to directions except for the following): Add an extra egg, replace water with milk, and replace oil with twice the amount of melted real butter
Biscuit cutter
Fresh flower for each cake (Gerber daisies work well)
Directions
Bake cake according to box directions (with above variations), in a 9 x 13 pan.
Use a biscuit cutter and cut out as many cakes as possible. Wrap each hockey puck-shaped cake in Saran Wrap individually, then wrap in foil and freeze. They can be frozen for up to two weeks at least.
Spread on initial layer of icing on the first layer of each cake while they're frozen. Place the cakes with icing in the refrigerator for 4-5 hours to thaw. Place a small amount of icing on the stand. Place the iced caked on the stand, and then place the un-iced cakes on top of the iced cakes, using 2-4 toothpicks to hold each one in place. Put each cake on a spinner or lazy Susan if possible, to ice the second layers of cakes with a flat knife, and Kathleen says, "Don't be shy with the icing!" She advises, if you think you need two batches of icing, make three!
Around the bottom of each cake, use a star attachment for an icing bag, and put enough icing stars to go around each cake. Use a skewer to make a short hole in the top of each cake and insert a flower with most of its stem removed.
Making the Butter Cream Icing
Ingredients
4 c. Powdered sugar, sifted
1 c. Butter, softened, unsalted, highest fat content possible
2-3 t. Vanilla
1-2 T. Heavy cream, more if icing seems dry
Directions
Add softened butter and vanilla to the mixing bowl and mix until completely combined.
Add powdered sugar and beat on low until it is incorporated. Then increase mixer to medium-high speed. Scrape sides and bottom of bowl often. When completely mixed the frosting may appear dry. Add cream a little bit at a time until frosting is the proper consistency.
Making the Stands
Materials
One unpainted wooden circle for each cake (Michael's), slightly larger than the biscuit cutter for the cakes
Gold spray paint
Multi-purpose epoxy glue
A Sheet of tiny circle tiles (hardware store)
Directions
Spray paint both sides of the wood circles and let dry. Spray paint both sides of each tiny tile, six tiles per cake stand. Glue pairs of tiles together and then glue three pairs of tiny tiles to the bottom of each wood circle. Let dry. Done!

